Tomato路由器脱机下载设置
Tomato的固件一直很强大,有不少网友只要自已的路由器能刷入Tomato固件,就千方百计的各种折腾。好在Tomato固件有国人在优化,并且出了中文版的了,越来越顺手了。
博主也用上了wr-520w的路由器,这个路由器,可以进行脱机下载,对于喜欢看电影的博主来说,是个非常好的功能。但是在Tomato里设置脱机下载,却不是一个简单的事,需要输入各种命令。不过没关系,只要理解了,就会变的非常简单。
在Tomato里进行脱机下载,主要进行以下步骤:telnet登录路由器-->清空硬盘分区-->重新划分分区-->格式化分区-->挂载分区。下面就开始吧,以下教程是在win 7下面,路由器是wr-520w,但所有的Tomato基本都差不多。
脱机下载,bt下载,pt下载设置教程:http://kzpu.com/archives/2934.html
一、用telnet登录到路由器
使用telnet的教程:http://kzpu.com/archives/2643.html
注意:以下红色字,是需要输入的命令
二、清空硬盘分区
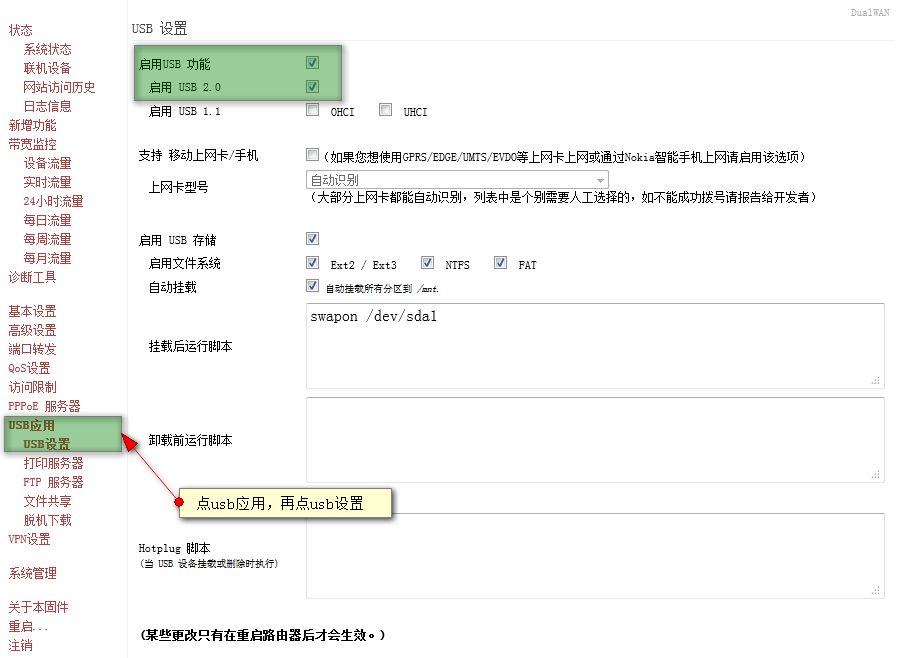
1,登录网页版的路由器,点左边的【USB应用】-->【USB设置】,然后在【启用USB 功能】【启用 USB 2.0】后面打勾,如果你的USB是1.0的,则在【启用 USB 1.0】后面也打上勾。然后点最下面的【保存设置】
2,查看想要挂载的硬盘下面,都有哪些分区,在刚刚登录的telnet里面输入以下命令
root@unknown:/tmp/home/root# fdisk -l /dev/sda
Disk /dev/sda: 20.0 GB, 20003878912 bytes
255 heads, 63 sectors/track, 2431 cylinders
Units = cylinders of 16065 * 512 = 8225280 bytes
Device Boot Start End Blocks Id System
/dev/sda1 1 17 136521 82 Linux swap
/dev/sda2 18 2431 19390455 83 Linux
可以查看到,我的硬盘下面,有二个分区,一个是/dev/sda1,一个是/dev/sda2

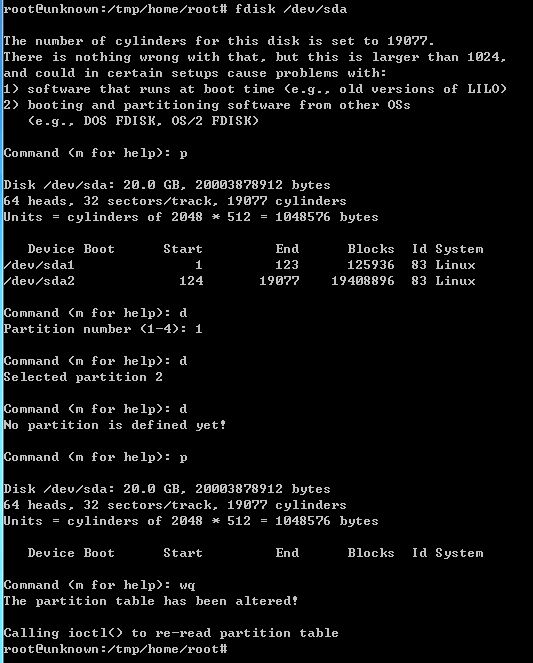
3,删除清空分区
fdisk /dev/sda :这个命令是对硬盘进行操作的命令
p:是查看分区
d:删除分区
下面命令用蓝色字体进行说明,前面加#注释
root@unknown:/tmp/home/root# fdisk /dev/sda
#这里输入fdisk /dev/sda开始对硬盘进行操作
The number of cylinders for this disk is set to 19077.
There is nothing wrong with that, but this is larger than 1024,
and could in certain setups cause problems with:
1) software that runs at boot time (e.g., old versions of LILO)
2) booting and partitioning software from other OSs
(e.g., DOS FDISK, OS/2 FDISK)
Command (m for help): p
#这里输入p查看硬盘的分区
Disk /dev/sda: 20.0 GB, 20003878912 bytes
64 heads, 32 sectors/track, 19077 cylinders
Units = cylinders of 2048 * 512 = 1048576 bytes
Device Boot Start End Blocks Id System
/dev/sda1 1 123 125936 83 Linux
/dev/sda2 124 19077 19408896 83 Linux
#从上面二行可以看出,这个硬盘有二个分区,分别是/dev/sda1,/dev/sda2
Command (m for help): d
#d是删除的命令,这里输入d开始删除旧的分区
Partition number (1-4): 1
#1代表是第一个分区,输入即可
Command (m for help): d
Selected partition 2
#因为有多个分区,所以再输入d,继续进行删除动作
Command (m for help): d
No partition is defined yet!
#再一次输入d,直到出现No partition is defined yet!这样才把分区删除完了
Command (m for help): p
#再一次输入p,查看删除后,还有没有分区
Disk /dev/sda: 20.0 GB, 20003878912 bytes
64 heads, 32 sectors/track, 19077 cylinders
Units = cylinders of 2048 * 512 = 1048576 bytes
Device Boot Start End Blocks Id System
#上面可以看出,没有分区了
Command (m for help): wq
#输入wq保存
The partition table has been altered!
Calling ioctl() to re-read partition table
root@unknown:/tmp/home/root#
三、重新创建分区
root@unknown:/tmp/home/root# fdisk /dev/sda
#输入fdisk /dev/sda进行分区动作
The number of cylinders for this disk is set to 19077.
There is nothing wrong with that, but this is larger than 1024,
and could in certain setups cause problems with:
1) software that runs at boot time (e.g., old versions of LILO)
2) booting and partitioning software from other OSs
(e.g., DOS FDISK, OS/2 FDISK)
Command (m for help): n
#n即为分区命令
Command action
e extended
p primary partition (1-4)
p
#输入p,即是主要分区
Partition number (1-4): 1
#这里是第一个分区
First cylinder (1-19077, default 1): 1
#从1开始
Last cylinder or +size or +sizeM or +sizeK (1-19077, default 19077): +128m
#这里输入+128m,是因为我们的路由器内存是64m,这里分区做为交换内存,即swap,是物理内存的二倍
Command (m for help): n
#继续输入n进行第二个分区
Command action
e extended
p primary partition (1-4)
p
#输入p,即是主要分区
Partition number (1-4): 2
#输入2,即第二个分区,第二个分区,不用输入起始和结束,直接二个回车就行了,就是下面二行。
First cylinder (124-19077, default 124): Using default value 124
Last cylinder or +size or +sizeM or +sizeK (124-19077, default 19077): Using def
ault value 19077
Command (m for help): p
#输入p,查看一下,刚才分好的二个分区
Disk /dev/sda: 20.0 GB, 20003878912 bytes
64 heads, 32 sectors/track, 19077 cylinders
Units = cylinders of 2048 * 512 = 1048576 bytes
Device Boot Start End Blocks Id System
/dev/sda1 1 123 125936 83 Linux
/dev/sda2 124 19077 19408896 83 Linux
#上面二行,分好的二个分区
Command (m for help): wq
#输入wq保存,退出
The partition table has been altered!
Calling ioctl() to re-read partition table
root@unknown:/tmp/home/root#

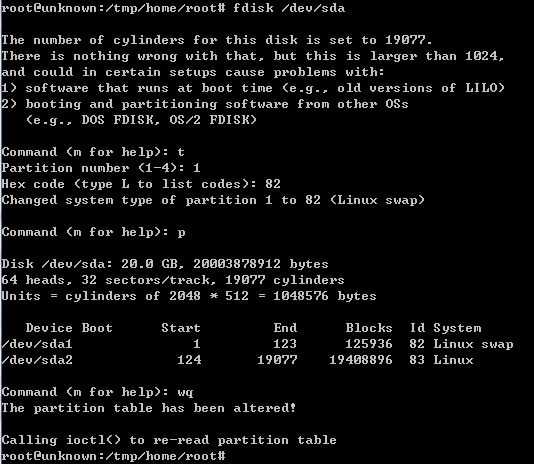
5,把交换分区sda1的id 更改成交换分区id
/dev/sda1 1 123 125936 83 Linux
/dev/sda2 124 19077 19408896 83 Linux
我们可以查看一下,这里二个分区的id,都是83,我们把第一个的id给更改一下
root@unknown:/tmp/home/root# fdisk /dev/sda
#输入fdisk /dev/sda,进行分区操作
The number of cylinders for this disk is set to 19077.
There is nothing wrong with that, but this is larger than 1024,
and could in certain setups cause problems with:
1) software that runs at boot time (e.g., old versions of LILO)
2) booting and partitioning software from other OSs
(e.g., DOS FDISK, OS/2 FDISK)
Command (m for help): t
#t命令为更改分区id
Partition number (1-4): 1
#输入需要更改id的分区,这里需要更改的是第一个分区,所以输入1
Hex code (type L to list codes): 82
#这里输入更改后的id,我们把它改为82
Changed system type of partition 1 to 82 (Linux swap)
Command (m for help): p
#输入p查看一下分区,果然已改好了
Disk /dev/sda: 20.0 GB, 20003878912 bytes
64 heads, 32 sectors/track, 19077 cylinders
Units = cylinders of 2048 * 512 = 1048576 bytes
Device Boot Start End Blocks Id System
/dev/sda1 1 123 125936 82 Linux swap
/dev/sda2 124 19077 19408896 83 Linux
Command (m for help): wq
#输入wq保存,退出
The partition table has been altered!
Calling ioctl() to re-read partition table
root@unknown:/tmp/home/root#
四、格式化分区
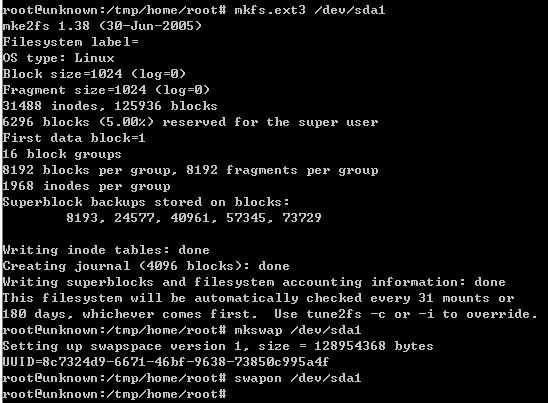
1,格式化第一个分区,把第一个分区格式化成ext3格式
mkfs.ext3 /dev/sda1
然后把第一个分区格式化成交换分区
mkswap /dev/sda1
挂载交换分区
swapon /dev/sda1
root@unknown:/tmp/home/root# mkfs.ext3 /dev/sda1
mke2fs 1.38 (30-Jun-2005)
Filesystem label=
OS type: Linux
Block size=1024 (log=0)
Fragment size=1024 (log=0)
31488 inodes, 125936 blocks
6296 blocks (5.00%) reserved for the super user
First data block=1
16 block groups
8192 blocks per group, 8192 fragments per group
1968 inodes per group
Superblock backups stored on blocks:
8193, 24577, 40961, 57345, 73729
Writing inode tables: done
Creating journal (4096 blocks): done
Writing superblocks and filesystem accounting information: done
This filesystem will be automatically checked every 31 mounts or
180 days, whichever comes first. Use tune2fs -c or -i to override.
root@unknown:/tmp/home/root# mkswap /dev/sda1
Setting up swapspace version 1, size = 128954368 bytes
UUID=8c7324d9-6671-46bf-9638-73850c995a4f
root@unknown:/tmp/home/root# swapon /dev/sda1
root@unknown:/tmp/home/root#
然后用free命令查看一下,是否挂载成功
root@unknown:/tmp/home/root# free
total used free shared buffers
Mem: 61664 29736 31928 0 932
-/+ buffers: 28804 32860
Swap: 125928 0 125928
出现swap,即可挂载成功
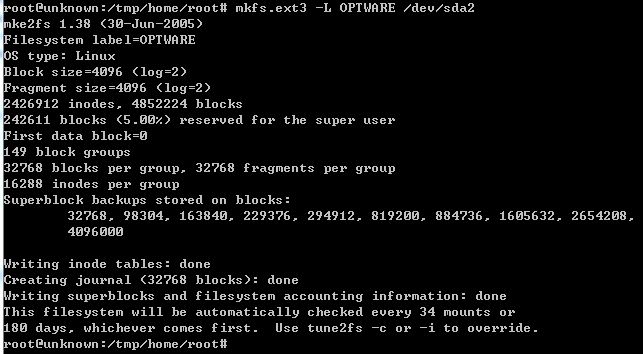
2,格式化sda2主分区为ext3文件系统,并且设置卷标为OPTWARE
输入:mkfs.ext3 -L OPTWARE /dev/sda2
如果出现No such file or directory字样,那么需要切换到web路由器管理设置界面,把usb功能关闭,在重新开启(关闭和开启都需要保存设置才生效),然后得新输入mkfs.ext3 -L OPTWARE /dev/sda2
root@unknown:/tmp/home/root# mkfs.ext3 -L OPTWARE /dev/sda2
mke2fs 1.38 (30-Jun-2005)
Filesystem label=OPTWARE
OS type: Linux
Block size=4096 (log=2)
Fragment size=4096 (log=2)
2426912 inodes, 4852224 blocks
242611 blocks (5.00%) reserved for the super user
First data block=0
149 block groups
32768 blocks per group, 32768 fragments per group
16288 inodes per group
Superblock backups stored on blocks:
32768, 98304, 163840, 229376, 294912, 819200, 884736, 1605632, 2654208,
4096000
Writing inode tables: done
Creating journal (32768 blocks): done
Writing superblocks and filesystem accounting information: done
This filesystem will be automatically checked every 34 mounts or
180 days, whichever comes first. Use tune2fs -c or -i to override.
root@unknown:/tmp/home/root#
四、挂载分区
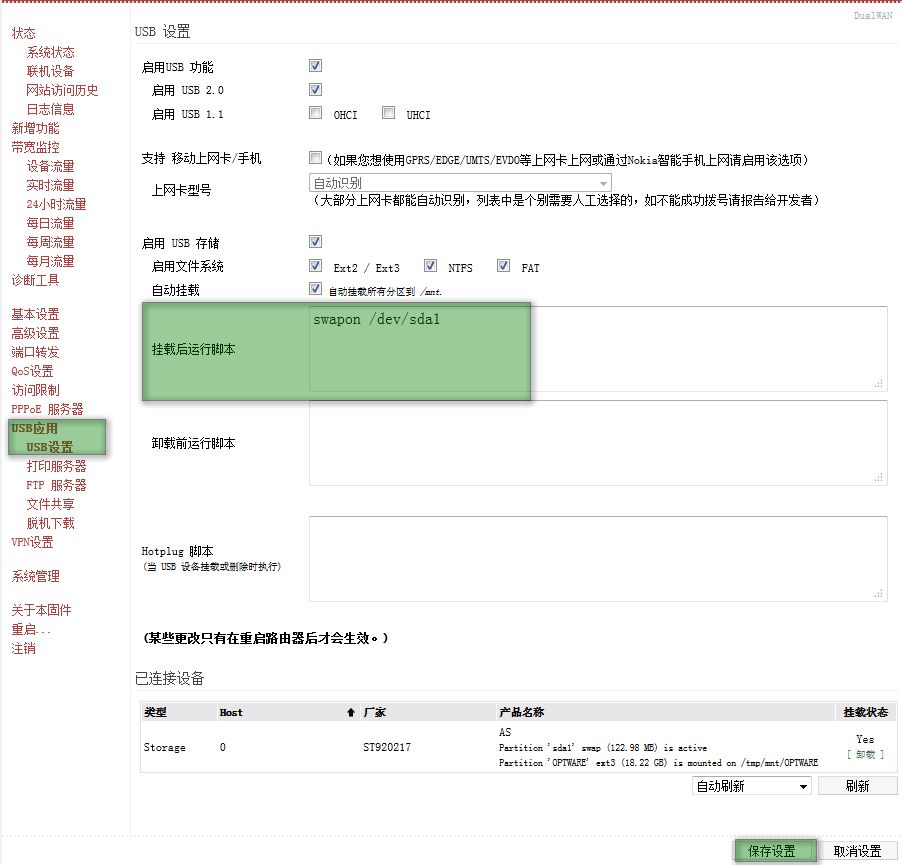
全部格式化完成以后,进行到路由器页面,进行挂载分区了。
登录网页版的路由器,点左边的【USB应用】-->【USB设置】,在这个页面的最下面,已可以看到我们刚才格式化好的硬盘了,点右边的挂载。

可以看到,已挂载成功了
 swap交换分区,每次重启过后,就要重新挂载,很是麻烦,我们用一个脚本命令,让他每次重启就自动挂载
挂载后运行脚本,在右边的框里输入swapon /dev/sda1,然后保存。